


Wet rooms are becoming a popular trend in bathroom design, and can add real value to your home as well as making bathing a much more luxurious experience. Any size bathroom has the potential to become a fantastic wet room, no matter what the size or where it is located.
Wet rooms are a fast growing trend in bathroom design, and when created with care and attention they can add real value to your home as well as making it a much nicer place for you to spend your time and, as you get older, a safer more convenient way of bathing.
It is a popular misconception that wet rooms only work well in sizeable bathrooms and rooms with a solid concrete floor. In reality, any size bathroom has the potential to be a fantastic wet room, no matter what the size or where it is located – on the ground floor or upstairs with traditional wooden floorboards. In very large bathrooms, the wet room area can be a feature of an otherwise more traditional bathroom, and in a smaller room, turning it into a wet room can create an illusion of extra space as well as ridding the room of the conventional space hogging shower cubicle and other features.
If you are considering a wet room project in your house, you should make sure you have paid attention to all the major considerations at the early design stages, to avoid costly mistakes or modifications later on in the project.
If you are planning for your old age and wish to stay in you home rather than move into a residential care home then the right type of wetroom is essential. If well-designed it will enable you to opt for live-in homecare rather than a care home later in life. Did you know that the No Place Like Home report from the Live-in Care Hub revealed that 97% of people would rather be cared for in their own homes even when they become frail or ill.
So here are some of the main things to think about when designing your ideal wet room at home:
- Drainage – The drain should be located at a sufficient distance from the bathroom door in order to avoid water running out of the room.
- Safety – The tiles for wet room floors need to be safe to walk on when wet, so go for specially designed wet room tiles or non-slip floor tiles.
- Ventilation – Adequate ventilation is an essential element, so go for an automatic extractor fan, ideally one which is fitted with a humidistat.
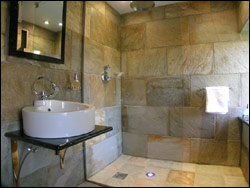
- Layout – A wet room does not need to be one big, wet box. Shower screens make nice features in the room, and can also serve to give the user some privacy as well as preventing other bathroom fittings from getting wet.
- Flooring – Usually the floor will need to be raised around 5 centimetres to allow for the installation of the waste pipe underneath the floor. It should also slope slightly towards the drain to help the water run in the right direction.
- Style – The benefits of a wet room are maximised if a minimalistic attitude is taken to the furnishing and layout. If you don’t want to sacrifice completely the traditional bathroom look, then you could consider a large walk in shower at one end of an otherwise regular bathroom.
- Strength – The room must be able to support the weight of the tiles and other materials. In some properties this may mean strengthening the floor before construction begins depending on the size of the room and the types of tiles chosen. Porcelain tiles are typically heavier than ceramic tiles, although they have many other advantages.
- Leaks – It goes without saying that water tightness in a wet room is of paramount importance. If you don’t have the skills to ensure your tiling is fully waterproof, then get an expert in to do this part of the construction for you, but if you plan to give it a go yourself – see our further advice on waterproofing below.
Waterproofing a Wet Room
Wet rooms are no longer seen as a luxury and are becoming more and more popular in ordinary homes as waterproofing methods improve. But just how do you waterproof a wet room?
Shower designs are becoming ever more sophisticated and more and more people expect or desire a more luxurious showering experience than would have been typical even just 5 years ago. It is often on their tick list when moving house. Combined with improving technology in waterproofing, tiling products and shower accessories it is now possible for even the humblest of homes to have a stylish wet room installed.
There are different ways to waterproof and install a wet room but if it is being done in an existing house rather than in a new-build (where options are greater because floor levels can be built to suit the wet room) then the most common method is to raise the floor level with a concrete screed and then install a flush concealed former that will help to ensure that the tiled floor surface is the correct angle for good drainage. Wet room formers come in a range of standard sizes but can also be manufactured to any shape and size you desire.
Once the former is in place the whole room, floors and walls, needs to be waterproofed before the tiles are fixed in place. Making sure the room is completely water tight is the most essential part of installing any wet room and whilst ceramic or porcelain tiles with a waterproof grout may be waterproof enough for an enclosed shower tray and surround or for a shower over a bath, they are not considered adequate enough for a shower area without a tray or a surround.
So never skimp on the waterproofing step.

The best way to create a fully water tight area is to use a waterproofing product that creates a barrier between the tiles and the floor or walls. One way of doing this is to lay a waterproof membrane, which is glued to the surface in non-overlapping panels with the joins between the panels then sealed with waterproof tape. The disadvantage of this type of waterproofing is that there is the potential for leakage if the waterproof panels shift over time to expose the joints.
The other option is to apply a waterproofing chemical product (many of which are environmentally friendly mineral-based products) which eliminates any concern about water leaking through gaps as it is applied in a single, continuous coat using a roller or spreader to any type of surface. Different products are available depending on the absorbency of the underlying substrate.
Whatever type of waterproofing you choose it will then be necessary to apply waterproof tape to all the wall-floor joints and corners before the substrate is ready for laying the chosen natural stone, porcelain or ceramic tiles.
Any type of water resistant tiling is suitable for a wetroom but bear in mind that some of the very large porcelain tiles now available might be difficult to cut to the required angle in order to create the correct slope towards the drain. The smaller the tile the easier it is to create the correct gradient; also small tiles, with their proportionally larger areas of grouting, will usually be more slip-resistant than large porcelain tiles.
For this reason mosaic tiles or small ceramic tiles tend to be more popular for the showering area of the wet room. For the design-conscious, large porcelain tiles can be used in the main part of the room and on the walls with complementary mosaics in the shower area.
Use a flexible adhesive to ensure surface stability if there is any movement in the floor over time and an anti-fungicidal, waterproof grout to install the tiles and finally seal all wall-floor joints with a silicone sealant. Most adhesives and grouts are suitable for all types of ceramic tiles, porcelain tiles and natural stone but if you have some very delicate stone check with the supplier for advice as some delicate natural stones are susceptible to staining from certain types of adhesive and grout.